i hope my 80's musical reference wasn't too random:)
Well friends, it has been some TIME!! Anywho, let me explain my absence and where i am... again.
SUBBING!? Yeah i won't get into the nitty gritty of how and why...
But, here I am. I subbed for three years after getting my bachelor's degree before working as an instructional assistant and before I had my teaching degree. It's a little weird to return to subbing in regular classrooms after five years! BUT let me tell you, I LOVE subbing. For real, it's a great gig. I have freedom from planning, grading, and real/prolonged discipline problems. I get the chance to work with a daily variety of ages and learners and the opportunity to watch great teachers do their thing and learn from them! It's rewarding each day to get to know new students, problem solve, present unfamiliar material and take each day as it comes. Now if only subs were paid accordingly...
Which has kept me from blogging...where do i go from here? My rough plan is to change format temporairily (until I get a full time art teaching job- cross your fingers!) and blog about my own current art projects which I FINALLY have time/energy for, art lesson plans, and tips, pointers, observations on subbing both for classroom teachers and subs:)
For all my teaching friends who continue to fight the fine fight in inner city teaching, my hat goes off to you.
Tuesday, November 15, 2011
Monday, May 16, 2011
A few of my favorite things...
While looking for a new 3-D project for my eighth graders, I came across this lesson plan on the Incredible Art Department... I knew I had PLENTY of cardboard and my students love working in groups (despite my reservations) so I thought we'd give it a shot! Our Frank Stella-inspired relief sculptures turned out a bit differently than planned, BUT the students LOVED this project!
I am proud of their ability to work together and "think outside the box".
Originally, this project was meant to be a bit more abstract, but that was tricky to conceptualize and we were a tad tied to the literal...but that's ok, we have to start somewhere! First, we completed the National Gallery of Art online guessing game (with a worksheet to ensure participation and understanding)
Then students chose an activity and answered some questions about the activity that helped them turn movement, equipment, etc. into shapes and colors. I really wish we had a display case for these!


 Does the bowling ball look like 'The Scream' to anyone else?

Below are some 7th grade examples working with value. After tracing 3-5 shapes (so the focus was on the shading) we drew 3 lines from one side of the paper to the other. Next, we chose 2 pairs of oil pastel light/dark color combos. One pair was outside the shapes and one pair was the inside. To incorporate writing skills, we wrote 3-5 sentences about what we VALUE. I like when students can interject a little bit of their identity into a project which is otherwise strictly art-skills based.


Things are winding down now that we're so close to the end of the year...BUT I find that classroom management is as important as ever, I don't have the luxury of letting up or the last couple weeks/days will be a HOT MESS. I want to communicate that in the art room it is business as usual and we are there to learn, EVERY DAY.
Wednesday, April 27, 2011
The VALUE of Tints and Shades
I hope you laughed at my art joke! I started teaching this lesson plan last year...this semester I made some major changes...with pleasing results, finally! Students in the past painted half the background and where we mixed 5 tints and 5 shades of any color, this time we mixed only 3 of each and used only pre-mixed secondary colors. I really like the collage-only background, it pulls the composition together nicely:)

 We used phonetics to help us remember what a tint was and what a shade was... tint and white both have "i" as the vowel, shade and black both have "a".
 I originally adapted this from a dick blick lesson plan but eliminated/substituted the fancy-dancy materials for what I had...small pieces of cardstock donated by a local print shop (for the background) and tempera paint instead of acrylic!
Sunday, April 17, 2011
Just a BASIC Saturday!
I am really enjoying the blogging process, BTW. It's great to share the positive experiences I come upon while teaching. But...one thing is missing. YOUR COMMENTS:) Please tell me what's on your mind! Or just say hello. Or whatever! Better yet, follow the blog AND comment! Ya' know, in between lesson planning, hanging artwork, and teaching...
Anywho,I just spent the BEST Saturday ever (well a close second, my wedding will be on a Saturday this summer, hopefully that will rock too!) at the Cleveland Institute of Art taking part in their BASIC workshop... For a mere $50 I got to hang out with ART TEACHERS from the area was fed breakfast, lunch and wine/cheese! and learned about low relief tiles from one of CIA's finest:) How cool is that?! I met some great people, got to swap stories and make art on my day off. I was really in 7th heaven. Here are a couple pix, I am kicking myself that I didn't bring my camera to document the process!
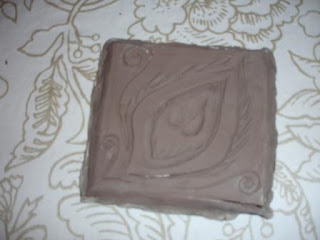 The original clay tile.
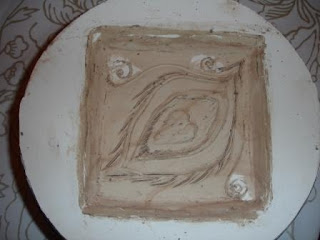
 The negative impression left once my tile popped out. This sucker is HEAVY. solid plaster!
 The instructor, Amy, and Val were great, super approachable and down to earth! Amy even offered to help me with firing up my kiln (I am a wee bit nervous of burning the school down).
I think the process of making low relief tiles in volume from a mold would really be a great set of skills for an upper level high school art class...Basically, you make a sandwich of 3 (ish) layers of clay : cutting into the clay exposing the lower layers to create a relief design. Then you pour a plaster mold around it and pull the sandwich o'clay out reusing the mold for as many clay tiles as you care to pop out! I didn't exactly follow the format of the layers, instead I did more carving. Amy recommended the book Handmade Tiles by Frank Georgini for detailed information on the process.
Learned some tips for mold making and plaster pouring for sure! I can't wait to attend the next workshop:)
Anywho,I just spent the BEST Saturday ever (well a close second, my wedding will be on a Saturday this summer, hopefully that will rock too!) at the Cleveland Institute of Art taking part in their BASIC workshop... For a mere $50 I got to hang out with ART TEACHERS from the area was fed breakfast, lunch and wine/cheese! and learned about low relief tiles from one of CIA's finest:) How cool is that?! I met some great people, got to swap stories and make art on my day off. I was really in 7th heaven. Here are a couple pix, I am kicking myself that I didn't bring my camera to document the process!
 The original clay tile.
 The negative impression left once my tile popped out. This sucker is HEAVY. solid plaster!
I think the process of making low relief tiles in volume from a mold would really be a great set of skills for an upper level high school art class...Basically, you make a sandwich of 3 (ish) layers of clay : cutting into the clay exposing the lower layers to create a relief design. Then you pour a plaster mold around it and pull the sandwich o'clay out reusing the mold for as many clay tiles as you care to pop out! I didn't exactly follow the format of the layers, instead I did more carving. Amy recommended the book Handmade Tiles by Frank Georgini for detailed information on the process.
Learned some tips for mold making and plaster pouring for sure! I can't wait to attend the next workshop:)
Friday, April 8, 2011
Breaks are great...spring break, winter break, thanksgiving, we ALL need to recharge. BUT returning from break can be something of an ordeal. I think the transition from home to school after more than a weekend away is especially rough for my students. Knowing this, I try to teach a lesson that is all things to all people...quickly presented, easily understood, focused yet purposeful. I like a lead-in lesson before we get into the next big lesson. This leaves me free to handle classroom management, doesn't stress students out and gets everyone back into the swing of things. I decided on a review/assessment collage for all my classes, a welcome change from 5 classes all working on different projects! I have taught collage before but stressing overlapping and coating with a layer of Mod Podge really made this project a success this time.


 Students had to cut out pictures from magazines displaying Line, Color, Shape and Texture- all the elements we've covered so far. Then they had to find a picture of something beautiful, something cool, and something that defines what Art is:) We displayed them on the chalkboard and wrote a postcard evaluating another student's collage. Some nice aestheticism and assessment thrown in there for ya. I handed out copies of student directions so students could work at their own pace and didn't need to rely on me for direction.


Friday, March 11, 2011
keepin' it real...real organized
Just a couple of pics of how I try to push self sufficiency on my 7th and 8th graders:)


I tried numbering/lettering the cabinets...it was CONFUSING for everyone. This way I don't have to tell students where supplies are kept or go fetch them. MWHA HA HA (evil art teacher laughter)

I just broke down and spent the $4 at the big box store (which I don't want to openly endorse) for these bins...I was using cardboard boxes but they were pretty raggedy and didn't have lids. It eliminates me having to track artwork around the room or call in an excavation team to find my desk!
In both instances if students "don't know where something is/what to do with unfinished artwork" I tell them, without any sarcasm, that I think they can figure it out...well maybe I raise an eyebrow;)
"Is I on the right track?"
As I am obviously not strictly speaking an English teacher, I swooned when my student asked me this question. Seriously. Annoying grammar aside (I have bigger fish to fry!) it warmed the cockles of my heart to hear one of my pet phrases repeated in question form. We're working on the Organic Shape/O'Keefe lesson plan that I wrote about earlier. This time around it's a little tough going. I realized after a couple days that students hadn't yet had the time in Art to build their self confidence in drawing or experience hard work paying off. I began to start and finish my hints/suggestions/critiques with "you're on the right track." Apparently, the phrase stuck! In fact, a few days later I again used this phrase with a new student. I didn't have time to explain myself when he asked, "What?" in honest confusion before another student jumped in with a translation of my catch phrase:) sometimes I feel like an honest-to-goodness teacher.
Wednesday, March 9, 2011
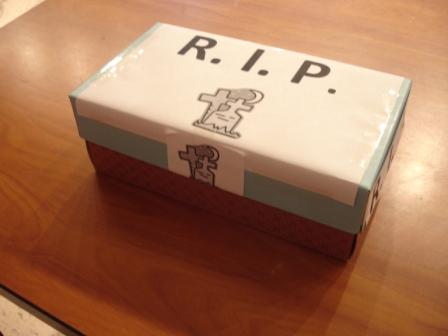
RIP: Bad Mondays
I have found week after week, month after month that my students REALLY hate Mondays. Beyond being tired or lethargic or slow, Monday's classroom behavior is usually the all time low for the week.
I think the general funk is due to the difficult transition from home to school, to the changes in expectation placed on them and their general feeling of lack of control over their environment. In fact, I try not to introduce anything new (or talk very much) on Mondays. I have ranted and raved in the past on the subject, to no avail. My students' external locus of control (is my ed psych professor smiling?) simply does not usually allow them to take power over such circumstance such as the day of the week.
So, after an especially frustrating class this Monday, I decided to try something NEW. Part of the idea came from somewhere on the Incredible Art Dept (if you know where exactly, please share!) for students who have a habit of saying, "I Can't".
First, students wrote or drew three reasons why Mondays are terrible. The paper was then folded in half, and they wrote "BAD MONDAYS" on it. Next we read with partners two pages of suggestions I printed off the internet to make Monday a better day (go to bed early, stop for a better breakfast, pick out a cuter outfit, etc.). We shared the suggestions and students even had some of their own! Then we tore the bad monday papers up, put them into a quick coffin I made:) and laid bad mondays to rest...complete with me humming Taps.

 I will not pretend that this has transformed classroom behavior in a day, but perhaps some students will think it over and allow it to change their current pattern of thinking... Well I can hope can't I?
I think the general funk is due to the difficult transition from home to school, to the changes in expectation placed on them and their general feeling of lack of control over their environment. In fact, I try not to introduce anything new (or talk very much) on Mondays. I have ranted and raved in the past on the subject, to no avail. My students' external locus of control (is my ed psych professor smiling?) simply does not usually allow them to take power over such circumstance such as the day of the week.
So, after an especially frustrating class this Monday, I decided to try something NEW. Part of the idea came from somewhere on the Incredible Art Dept (if you know where exactly, please share!) for students who have a habit of saying, "I Can't".
First, students wrote or drew three reasons why Mondays are terrible. The paper was then folded in half, and they wrote "BAD MONDAYS" on it. Next we read with partners two pages of suggestions I printed off the internet to make Monday a better day (go to bed early, stop for a better breakfast, pick out a cuter outfit, etc.). We shared the suggestions and students even had some of their own! Then we tore the bad monday papers up, put them into a quick coffin I made:) and laid bad mondays to rest...complete with me humming Taps.

Sunday, February 27, 2011
Student Teachers: For Your Eyes Only
I recently replied to a student (art) teacher's comment on another blog and it got me thinking about my own student teaching experience and all i learned along the way...Sooo, I thought I'd revisit those gleanings as a post for student teachers.
My advice is as follows:
1) You are a guest.
My dear friend, do not create undue stress for yourself by trying to tackle all of the classroom issues on your own. This is practice for you, do not tire yourself out for the 'big game' that is your impending career. I say this as a self-proclaimed intense person. Please remember that no matter how effective/polished/inefficient/slap-dash/strict/orderly/messy, (whatever!) your mentor teacher seems to you, he/she has found a way that works FOR THEM, and it has developed over a period of time. It does not have to work for you, take it with a grain of salt. Try to figure out what led him/her to his/her present methods. Why might it work/not work for you? A good house guest makes the bed after themselves and doesn't take the liberties a family member does...Be helpful, but remember you are NOT a student OR the teacher. It's a learning experience, be there in the moment for that purpose.
2) Observe and Report
If it's not part of your teacher-training, keep a journal! Write about your Mentor teacher's interactions, style, instructional strategies; compare to what you learn in your ed classes and to your own intuition. This is a time to reflect on YOU and plan for your future teaching. When you begin your first year of teaching, it will be hard to find the time to gather such information. It will also be helpful to have a written record to go back to. Start lists of websites, inspirational artists, lesson plan ideas, useful bits of info from ed. textbooks:)
The more inspired you are to teach, the more inspiring you will be to your students.
3) COMMUNICATE
Knowledge is power, both for you and your mentor teacher. Be open (but professional!) about your take on strategies, management, etc. ASK questions, be open to new ideas from all angles. Be a team, it's an awesome advantage to have TWO teachers in the room! Use it- devise plans of attack, divide tasks, ask for help. Try to remember what it felt like being in the students' place. Talk to your students, especially if they are older, about their learning and expectations. Keep your college professor/supervisor in the loop! He/she is a WEALTH of information, but super busy, so ASK for resources, and if you need it, guidance!
4) Steal, steal, steal!

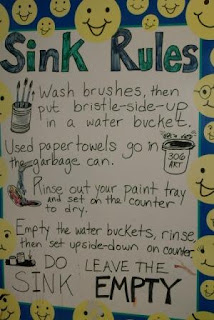


 Photograph everything- posters, projects, organizational methods, the room. These are from my own student teaching experience:) Ask for copies, most teachers are happy to share. I still use the lesson plan template shared with me during student teaching.
*Thanks to Beth Spann, Kristin Plambeck, Christine Hoffman, MaryAnn Popovich, Darlene O'Donnell and Mary Hastings for making my student-teaching experience meaningful.
My advice is as follows:
1) You are a guest.
My dear friend, do not create undue stress for yourself by trying to tackle all of the classroom issues on your own. This is practice for you, do not tire yourself out for the 'big game' that is your impending career. I say this as a self-proclaimed intense person. Please remember that no matter how effective/polished/inefficient/slap-dash/strict/orderly/messy, (whatever!) your mentor teacher seems to you, he/she has found a way that works FOR THEM, and it has developed over a period of time. It does not have to work for you, take it with a grain of salt. Try to figure out what led him/her to his/her present methods. Why might it work/not work for you? A good house guest makes the bed after themselves and doesn't take the liberties a family member does...Be helpful, but remember you are NOT a student OR the teacher. It's a learning experience, be there in the moment for that purpose.
2) Observe and Report
If it's not part of your teacher-training, keep a journal! Write about your Mentor teacher's interactions, style, instructional strategies; compare to what you learn in your ed classes and to your own intuition. This is a time to reflect on YOU and plan for your future teaching. When you begin your first year of teaching, it will be hard to find the time to gather such information. It will also be helpful to have a written record to go back to. Start lists of websites, inspirational artists, lesson plan ideas, useful bits of info from ed. textbooks:)
The more inspired you are to teach, the more inspiring you will be to your students.
3) COMMUNICATE
Knowledge is power, both for you and your mentor teacher. Be open (but professional!) about your take on strategies, management, etc. ASK questions, be open to new ideas from all angles. Be a team, it's an awesome advantage to have TWO teachers in the room! Use it- devise plans of attack, divide tasks, ask for help. Try to remember what it felt like being in the students' place. Talk to your students, especially if they are older, about their learning and expectations. Keep your college professor/supervisor in the loop! He/she is a WEALTH of information, but super busy, so ASK for resources, and if you need it, guidance!
4) Steal, steal, steal!


*Thanks to Beth Spann, Kristin Plambeck, Christine Hoffman, MaryAnn Popovich, Darlene O'Donnell and Mary Hastings for making my student-teaching experience meaningful.
Friday, February 18, 2011
lesson plan: using a sketchbook
I developed this lesson for several reasons... First of all I hoped students would form a bond with their sketchbook that they'll be using all semester. I also wanted them to be comfortable writing, drawing and collaging in the same space. And as an added bonus, students are exposed to the beauty and wonder of the world outside of their small community in the city through National Geographic.
As 7th and 8th graders I think it's really valuable for to take in new information and be able to utilize it, especially in their ART!


This is Part One of the lesson. Students are required to look through National Geographic magazines and find a picture of something beautiful, something weird, something scary and something they'd like to see in person. Then they label the pictures accordingly and write a sentence or two about what they found.
I really love the thoughtfulness behind this student's responses:)

The above page is Part Two of the assignment...Students select a theme from a list and fill one entire sketchbook page according to their theme, combining words and pictures together.


I stress to students that, "you'll only get out of this lesson what you put into it!" Some students get more out of it than others:)

Be ready for lots of discussion and noise as students discover weird, scary, awesome people/places/things outside of their comfort zone! It's so fun to observe!
Thursday, February 17, 2011
Not yet a well oiled machine...
What have I learned in my two years of teaching in an urban (art) classroom?
Be prepared. Be very prepared.
I'm posting some pictures of methods I've developed to deal with an assortment of issues. Like new students transferring in...like students returning from 3, 5, 7 days of suspension...like 25 students vying for my attention not so patiently...like students who may not know how to spend free time constructively


 A daily reminder taped to my desk:)
How do you stay organized?
Be prepared. Be very prepared.
I'm posting some pictures of methods I've developed to deal with an assortment of issues. Like new students transferring in...like students returning from 3, 5, 7 days of suspension...like 25 students vying for my attention not so patiently...like students who may not know how to spend free time constructively


I put together this binder of information I go over as a Powerpoint at the beginning of the semester. I am also making a student information sheet to fill out and that indicates that the student read and understands our rules/procedures.

Students check this binder when they return from an extended absence, read necessary information and complete worksheets, assignments, and/or extra credit to get caught up with concepts and the gradebook. Reteaching entire lessons and days of instruction became very time consuming when the rest of the class still needs direction, assistance, and affirmation.

I am quickly closing all gaps which leave me open to students claiming they don't what is required/expected. Saying it is not enough, so I cover my bases!


How do you stay organized?
Subscribe to:
Posts (Atom)